- /
- /
Work times – planning and records
The Firmao system allows us to keep records of work time. We can enter work times manually or automatically. Recording work time is mandatory for every employer, regardless of the number of employees in the company, and the Firmao system effectively makes it easier for us. Any changes to work times (including their manual editing) are visible in the module “Changelog”.
Important! Administrator of the entire system can always edit actual and planned work times of all users. Moreover, in the “Permissions” tab they can specify users who cannot manually edit scheduled (past and present)) and actual work times (all).
Enabling the “Work times” module
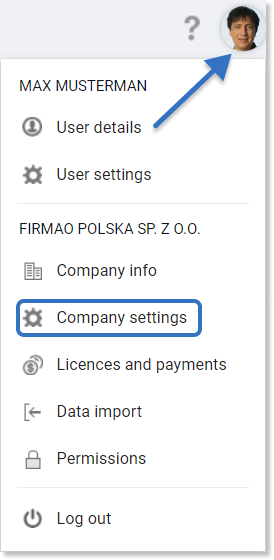
“Work times” option is disabled by default when we create a new account. To enable it, we need to click on the avatar and then select “Company settings” from the drop-down list.
Options for enabling/disabling modules available in the Firmao system will be displayed. We need to check the “Working times” box under the main “Organization of work” module.
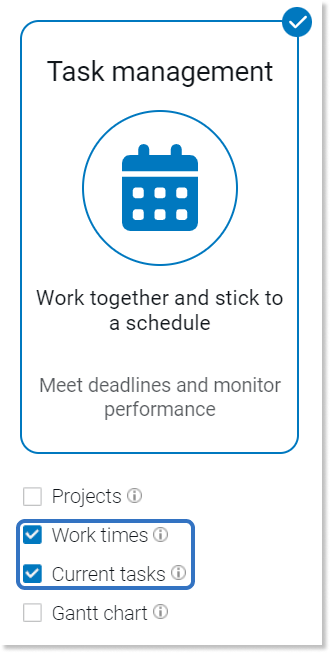
“Current tasks” option requires the “Work times” module to be enabled.
Turning on just the “Work times” module will only allow us to enter actual working times by hand (“Actual work times” tab in the task details view). Enabling the additional “Current tasks” option enables automatic records of actual working times. By clicking on the “Start task” in the upper right corner of the task detail view or setting the task status to “In progress”.
How to select the currently performed task?
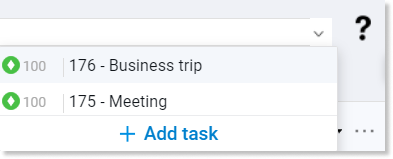
If we have enabled the “Current tasks” option in the company settings, in the upper right corner of the Firmao system there will be an option to set the current task.

To use this option, we must click on “Select your current task” and then from the displayed list select the one we want to be displayed as executed.
After selecting a given task, in the upper right corner of the system, we can:
- change current task
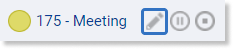
- stop current task
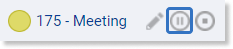
- finish current task
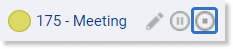
When we interrupt or complete a task we were performing, its status will be changed automatically.
How to enable the confirmation window for changing the currently performed task?
In the Firmao system, it is also possible to enable “Confirmation window after finishing current task”. To do this, we need to go back to the company settings and then to the “Other” and check the box.
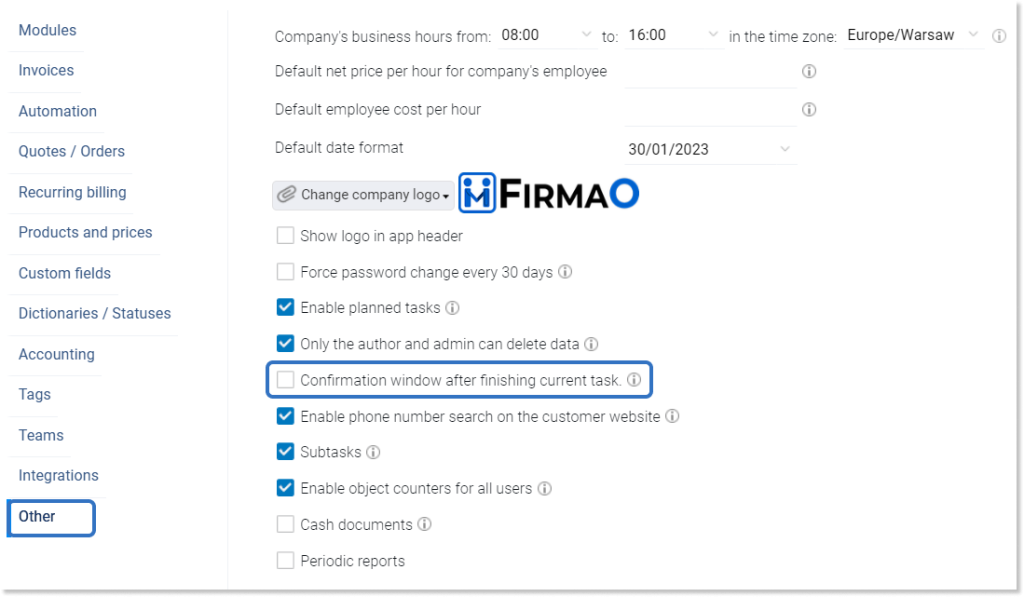
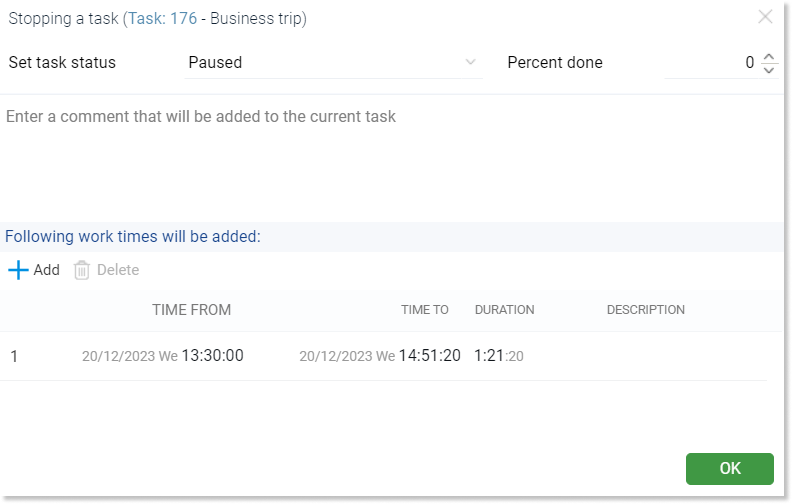
Enabling this option means that when interrupting or ending the current activity, a window will be displayed with information about what work time entries will be added. The employee then has the opportunity to modify this data before saving it.
Categories of working times
In the Firmao system, we have three categories of working times that we can choose:
- Planned work time – allows us to plan the time we will spend on completing the task. This option is particularly useful when planning work schedules. Thanks to it, the person responsible for assigning tasks to employees knows when a given employee is available and can better organize the division of work.
- Current work time – we mark the task as currently being performed. Adding working time is described in the next section. Work time is shown in the task/user list view and calendar as “Current work time”. By recording many separate working times, it is possible to add up and provide the entire working time spent on a given task.
- Actual work times – “Current work time” transforms into “Actual work time”, when an employee finishes or interrupts a given task. Actual work times show the total hours worked, the task being performed, and the exact date and time of the start and end/pause of the task.
How can I add working times?
In the Firmao system, we can add working times in several ways, which are described below.
Adding work times from the top menu
From the top menu, we need to select the “Work times” module. A window with the default view of actual working times will appear on the screen. To add a new working time record, we have to click the green “Add” button in the upper right corner of the window.

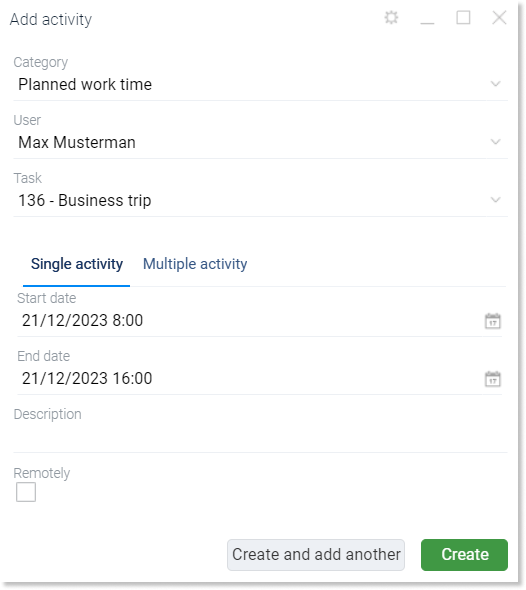
After clicking the “Add” button a creation window will open, set to a one-time activity by default, in which we need to complete information such as:
- category (sickness, planned work time, actual work time, leave),
- user,
- task,
- start and end date of work time,
- optionally, we can add a description and select the remotely check box.
In the add activity window, we also have the opportunity to select multiple activity. Thanks to this, knowing that, for example, we will work the same hours every day for a week, we can set the planned working time multiple times, instead of setting each day separately. In multiple activities, in addition to the data that is also mandatory in single-use activities, we additionally complete:
- repeating (daily, weekly, monthly, yearly).
- repeat every — we choose, how often the set automation should repeat.
- start and end date — i.e we set exact dates when a given cycle is to start and end.
- hours – what hours should work times start and end on the day when a given cyclicality occurs (optional).
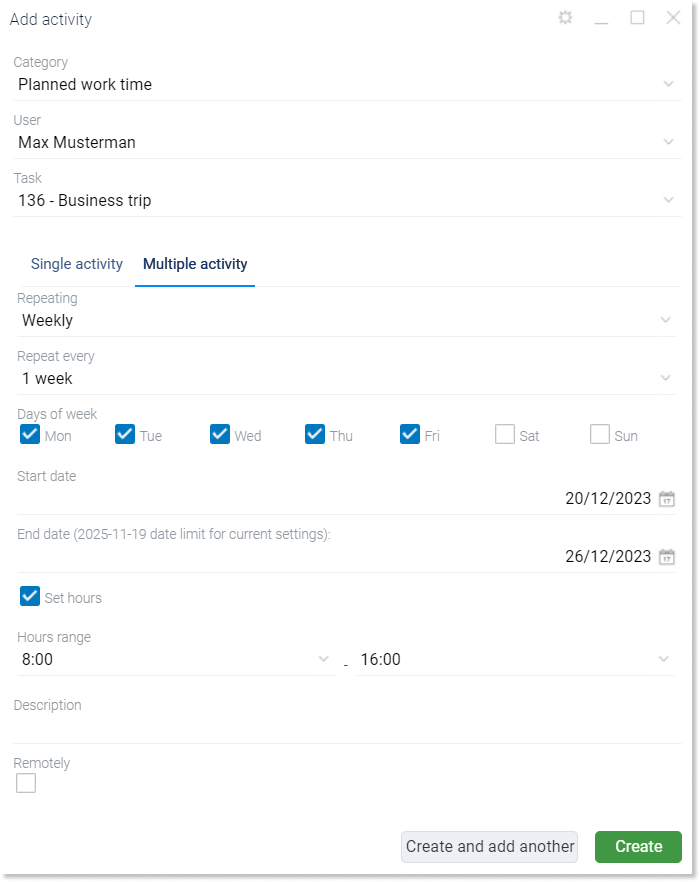
To save the settings of added working times, we need to click the green “Create” button in the lower right corner of the window.
Adding work times from the calendar view
The second way to add work time is to use calendar. Read more about the calendar and setting work times in it here.
Adding work times from the task level
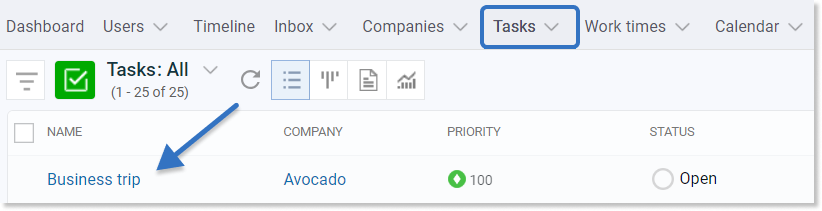
The third way to add work time is by using tabs in the details of a given task.
To add work time records, we need to select “Tasks”. Then we go to the detail view of the task to which we want to add working times.
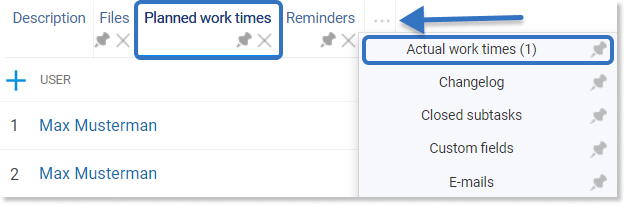
We need to select “Actual work times” or “Planned work times” from the tabs. Then we click on 
Important! By default ”Planned work times” are in the hidden menu, which can be accessed by clicking the three dots icon at the end of the tabs list. To pin this tab to the main menu, we need to click on the pin icon located to the right of the name.
Further steps regarding adding an activity are analogous to the instructions presented above.
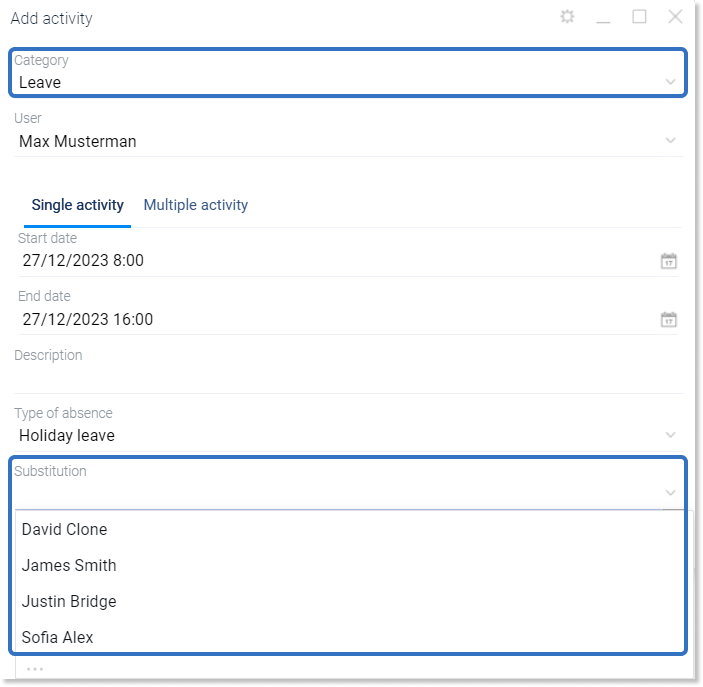
How to choose a substitution during leave or sickness?
When adding working times, we can also use the “Category” field to choose Leave or Sickness. In this case, we need to indicate “Substitution”.
How to check work times?
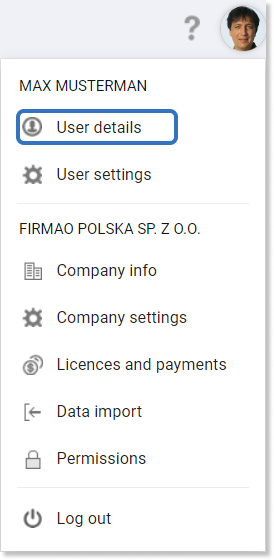
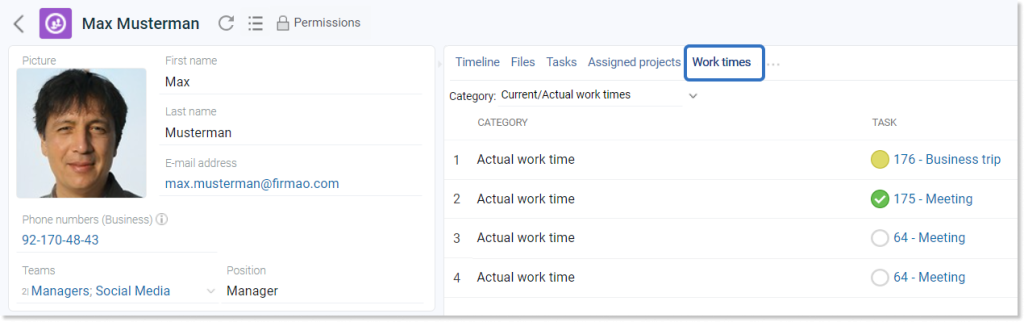
To check our work times, we need to click on the avatar, “User details”, and then select the tab: “Working times” tab.
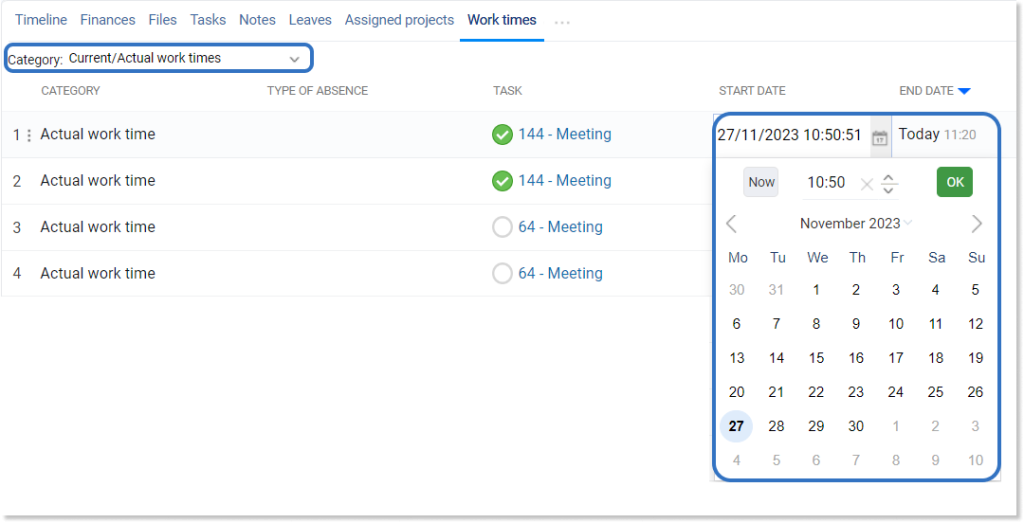
In this view, we can edit the dates and start and end times of individual working times. In the upper left corner of the tab, we can select the category we want to select (planned or actual work time, sickness, leave). To edit working times, we need to click on the start/end field, change the date and/or time and confirm with the green “OK” button in the upper right corner of the calendar view.
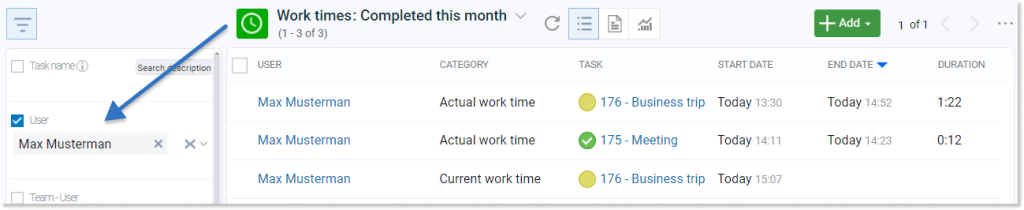
We can also check work times by clicking the “Work Times” module in the top menu, and then selecting the user whose work time we want to check in the filters.
Analyses regarding work times
We can also display work times in the “Analyses” view, by clicking on the “Analyses” icon in the top menu of the panel.

We can also edit the chart category, where we can specify the name of the chart, its type, grouping, and measurability according to the XY axis.

Work time – report generation
Based on the created work times, we can generate a report. To do this, we need to select the “Work times” module from the top menu. Then, from the work times list view, we go to the “Report” tab.
Important! If we don’t see the “Report” tab, then we need to enable it in “Company settings”. We can find step-by-step instructions here.

By default, the set report type is “Time entries report”. However, we can change this view by clicking on to the right of the report type field (screenshot below). Then, from the drop-down list, we can select another type that interests us, e.g. “Time entries report per company”.
Important! We can also determine what information is included in the report (e.g. we want to change the time entries report from actual to planned work times or adjust the type of leave) by adjusting the filters on the left side of the screen.
